The minimalist aesthetic, characterized by its intentional simplicity and focus on essential elements, has profoundly impacted interior design. This approach, extending to wall decor, transcends mere decoration; it becomes a statement of intentionality, a curated expression of personal style. Minimalist wall decor isn’t about emptiness; it’s about thoughtful selection and strategic placement, creating a visually calming and sophisticated atmosphere.
We’ll explore the principles, styles, creation, sourcing, and integration of minimalist wall decor into various interior design schemes, revealing how negative space, carefully chosen materials, and precise color palettes contribute to a harmonious and impactful aesthetic.
This exploration delves into the psychology of minimalist design, examining how the reduction of visual clutter can positively influence mood and cognitive function. We’ll examine the scientific basis for the calming effect of clean lines and uncluttered spaces, and consider the impact of different textures and materials on the overall sensory experience. From the selection of a single, bold line drawing to the strategic arrangement of a gallery wall, each element contributes to a holistic design that speaks volumes without overwhelming the senses.
We will also discuss the practical aspects of sourcing and creating minimalist art, offering actionable advice and resources to help you transform your living space.
Defining Minimalist Wall Decor
Minimalist wall decor, a significant aspect of interior design, transcends mere aesthetics; it’s a deliberate philosophy reflecting simplicity, functionality, and intentional design. It emphasizes the power of less, focusing on a carefully curated selection of pieces to create a visually calming and uncluttered space. This approach aligns with the broader minimalist movement, prioritizing quality over quantity and fostering a sense of serenity.Minimalist wall decor is characterized by its intentional restraint.
It avoids visual clutter and emphasizes clean lines, simple shapes, and a limited color palette. The overall effect is a sense of calm and order, allowing the viewer’s eye to rest and appreciate the carefully chosen elements. This approach contrasts sharply with maximalist styles that embrace abundance and visual complexity. The impact of minimalist design is profound, creating a space that feels both spacious and inviting.
Materials Used in Minimalist Wall Art
The materials used in minimalist wall art are often chosen for their inherent simplicity and elegance. Natural materials, such as wood, stone, and unbleached cotton, are frequently incorporated to bring a sense of organic texture and warmth. Metals, particularly those with brushed or matte finishes, like stainless steel or iron, offer a sleek and modern counterpoint. Geometric shapes cut from high-quality paper or cardboard, meticulously painted in muted tones, provide another avenue for artistic expression.
The selection of materials directly contributes to the overall aesthetic of the space, emphasizing clean lines and a sense of refined simplicity.
Color Palettes in Minimalist Wall Decor
Minimalist wall decor typically employs a restricted color palette, often favoring neutral tones. Monochromatic schemes, using varying shades of a single color, are common, creating a sense of visual harmony and tranquility. Neutral colors like white, beige, gray, and black form the foundation of many minimalist designs. Earthy tones such as muted greens, browns, and creams can be incorporated to add warmth and texture.
The use of a limited color palette avoids visual overload, allowing the chosen artwork or decorative elements to stand out and become focal points. For example, a single piece of art in a bold color can be effectively showcased against a backdrop of neutral tones.
The Impact of Negative Space in Minimalist Wall Design
Negative space, the area surrounding the artwork or decorative elements, plays a crucial role in minimalist wall decor. It is not simply empty space; rather, it is an integral component of the design, contributing to the overall aesthetic balance and visual impact. The judicious use of negative space allows the viewer’s eye to focus on the chosen elements, enhancing their perceived importance and impact.
A large, unadorned wall section, for instance, can create a sense of spaciousness and serenity, allowing the few carefully chosen pieces to stand out. The effective use of negative space enhances the sense of calm and order inherent in minimalist design, making the space feel both open and inviting.
Popular Minimalist Wall Decor Styles
Minimalist wall decor transcends mere aesthetic preference; it’s a design philosophy rooted in functionality and intentionality. By carefully selecting a few key pieces, we can create visually striking and calming spaces. Understanding the nuances of different minimalist styles allows for a more personalized and effective approach to interior design. This exploration delves into the popular styles, their applications in various rooms, and illustrative design schemes.
Comparison of Minimalist Wall Decor Styles
Three prominent minimalist styles—Scandinavian, Japanese, and Modern—each offer unique approaches to wall decoration. Scandinavian minimalism emphasizes natural light, clean lines, and a muted palette of whites, grays, and pastels, often incorporating natural materials like wood and wool. Japanese minimalism, deeply rooted in Zen philosophy, prioritizes simplicity, functionality, and a connection with nature. Its color palette tends towards earth tones and natural textures.
Modern minimalism, characterized by its geometric shapes, sleek lines, and monochromatic color schemes, often features metallic accents and a focus on functionality. While all three prioritize simplicity, their emphasis on specific materials, colors, and overall feeling differs significantly. For example, a Scandinavian approach might use a large, light-colored wood panel as a focal point, whereas a Japanese approach might feature a single, carefully chosen piece of calligraphy.
A modern minimalist scheme might utilize a geometrically patterned wallpaper in a single, bold color.
Minimalist Wall Decor for Various Room Types
The application of minimalist principles varies depending on the room’s function and purpose. In a living room, a large, unframed canvas with a single, bold color or a minimalist geometric print can serve as a focal point, complemented by a few carefully placed shelves displaying curated objects. A bedroom benefits from a calming atmosphere, achieved through muted colors, subtle textures, such as a macrame wall hanging, or a simple, geometric mirror.
Bathrooms, often smaller spaces, benefit from using a single, large mirror to maximize light and space. A single, textured tile or a piece of minimalist art can add a touch of personality without overwhelming the space.
Minimalist Wall Decor Schemes
Here are three diverse minimalist wall decor schemes demonstrating the versatility of the style:
Scheme 1: Textured Neutrals: This scheme utilizes a neutral color palette of whites, creams, and greys, incorporating varying textures. Imagine a cream-colored wall with a large woven tapestry hanging centrally, its natural fibers providing textural depth. A simple, wooden shelf below displays a few carefully selected ceramic objects, introducing a subtle contrast in material. This creates a calm, inviting atmosphere ideal for a bedroom or living room.
The natural textures evoke a sense of warmth and comfort without visual clutter.
Scheme 2: Monochromatic Modernity: This scheme embraces a monochromatic approach using varying shades of a single color, such as deep grey. The wall itself could be painted a dark grey, complemented by a framed black and white photographic print. A sleek, metallic shelf would provide a contrast in material, displaying simple, geometric sculptures. This scheme creates a sophisticated and modern atmosphere suitable for a living room or home office, with the monochrome palette providing a sense of order and elegance.
The use of metallic accents introduces a touch of luxury.
Scheme 3: Natural Accents: This scheme uses natural materials and earthy tones. Consider a light beige wall adorned with a collection of dried botanicals arranged in a minimalist frame. A simple, wooden mirror adds both functionality and a touch of natural texture. A small, woven basket on a shelf could further enhance the natural aesthetic. This scheme evokes a serene and peaceful atmosphere, ideal for a bedroom or bathroom.
The organic elements create a calming and grounding ambiance.
Minimalist Styles and Defining Characteristics
| Style | Color Palette | Materials | Defining Characteristics |
|---|---|---|---|
| Scandinavian | Whites, grays, pastels, natural wood tones | Wood, wool, linen, natural stone | Natural light, clean lines, functionality |
| Japanese | Earth tones, natural wood tones, black | Wood, bamboo, paper, natural fibers | Simplicity, functionality, connection with nature |
| Modern | Monochromatic, bold colors, metallic accents | Metal, glass, concrete, polished wood | Geometric shapes, sleek lines, minimalism |
Creating Minimalist Wall Decor
Minimalist wall decor transcends mere aesthetics; it’s a mindful approach to spatial design, emphasizing simplicity, functionality, and the intentional use of elements. Creating such decor involves understanding the principles of minimalism and applying them creatively to various mediums. This section explores the practical steps in crafting several minimalist wall art pieces.
Geometric Wall Hanging Construction
Constructing a minimalist geometric wall hanging offers a hands-on approach to minimalist art. The process leverages the principles of geometry and utilizes readily available materials. For example, one could create a striking piece using sustainably sourced wood dowels of varying lengths. These dowels, meticulously cut and sanded to precise dimensions, can be arranged to form a geometric pattern, such as a simple triangle or a more complex arrangement.
The dowels can be connected using strong, yet aesthetically neutral, adhesive or small, almost invisible, screws. The final piece, when stained or left in its natural state, provides a textural and visually interesting element for the wall. The entire process emphasizes precision, clean lines, and the beauty of simple forms. Consider experimenting with different wood types for varied textures and colors.
Custom Minimalist Wall Decal Design
Designing a custom minimalist wall decal allows for personalized expression within the minimalist framework. The process begins with conceptualization – choosing a simple, impactful design. This could involve a single, bold geometric shape, a delicate line drawing, or a stylized word or phrase. Once the design is finalized, it needs to be digitized. Vector graphics software is ideal, as it allows for scaling without loss of quality.
The chosen design is then exported as a high-resolution file suitable for printing on vinyl decal material. The decal can be printed using a professional printing service or, for smaller projects, a high-quality home printer. Applying the decal involves carefully positioning it on the wall and smoothing out any air bubbles to ensure a seamless finish. A simple, monochromatic color scheme will enhance the minimalist aesthetic.
Remember to consider the wall’s texture and color when selecting the decal’s color for optimal contrast and visual impact.
Minimalist Photograph or Print Framing
Framing a minimalist photograph or print is crucial for its presentation. The frame itself should complement, not compete with, the artwork. A thin, unadorned frame in a neutral color such as black, white, or a light wood tone is ideal. The matting, if used, should also be minimalist, perhaps a simple, single-color mat in a shade that subtly complements the photograph’s tones.
The frame’s size should be carefully chosen to create a balanced composition; avoid overly large or small frames that might overshadow or diminish the artwork. Proper mounting of the print within the frame is essential to prevent damage and ensure a clean, professional look. Consider using archival-quality materials to preserve the print’s longevity. The framed piece, when hung, should be positioned to receive optimal lighting to showcase its details and textures.
Minimalist Gallery Wall Arrangement
Creating a minimalist gallery wall requires careful planning and execution. The core principle is to maintain visual harmony and avoid visual clutter. Begin by selecting a cohesive collection of artwork; this could be a series of photographs, prints, or a combination of both, all sharing a similar color palette or theme. Consistency in framing is also key—use the same type of frame for each piece to maintain a unified look.
Before hanging, arrange the pieces on the floor to visualize the final arrangement, experimenting with different layouts until a balanced and pleasing composition is achieved. Using a level to ensure the frames are straight is crucial. The spacing between the frames should be consistent, contributing to the overall sense of order and simplicity. The arrangement should be carefully considered in relation to the surrounding furniture and decor to avoid overwhelming the space.
The entire process is about balance, careful selection, and maintaining a sense of calm within the composition.
Sourcing Minimalist Wall Decor

The acquisition of minimalist wall decor, while seemingly simple, involves navigating a diverse marketplace with varying pricing, quality, and aesthetic approaches. Understanding the landscape of online and offline retailers, coupled with strategic sourcing techniques, is crucial for curating a space that reflects both personal style and budgetary constraints. This exploration delves into the practicalities of finding unique and affordable minimalist wall art, providing a framework for informed decision-making.The search for minimalist wall decor spans both the digital and physical realms.
Online platforms offer unparalleled breadth of selection, while brick-and-mortar stores provide the tactile experience of assessing quality firsthand. The pricing and quality variations are significant, reflecting differences in materials, craftsmanship, and brand recognition. For instance, a mass-produced print from a large online retailer might cost significantly less than a handcrafted ceramic piece from an independent artisan, but the latter often boasts superior longevity and uniqueness.
Online and Offline Resources for Minimalist Wall Decor
Online marketplaces like Etsy, Amazon Handmade, and Society6 offer a vast array of minimalist wall art, from prints and posters to sculptures and textiles. These platforms often host independent artists and small businesses, providing access to unique, handcrafted pieces. In contrast, large home decor retailers such as West Elm, CB2, and IKEA offer more mass-produced, readily available options, often at lower price points.
Offline, exploring local art galleries, antique shops, and craft fairs can yield unexpected discoveries, offering the opportunity to connect directly with artists and discover one-of-a-kind pieces. The specific resources available will vary geographically, underscoring the importance of local exploration.
Pricing and Quality Comparison of Minimalist Wall Art
Pricing for minimalist wall decor varies dramatically based on factors such as material, size, origin, and brand. A simple, mass-produced print might cost between $10 and $50, while a limited-edition print or original artwork could range from hundreds to thousands of dollars. Similarly, handcrafted items, such as ceramic sculptures or woven tapestries, typically command higher prices than mass-produced alternatives.
Quality, too, varies considerably. Mass-produced items may utilize less durable materials and printing techniques, leading to shorter lifespans compared to handcrafted pieces made with high-quality materials and meticulous craftsmanship. Consider the longevity of the piece and its potential resale value when evaluating pricing.
Tips for Finding Unique and Affordable Minimalist Wall Decor
Discovering unique and affordable minimalist wall decor requires a blend of resourcefulness and strategic planning. Consider exploring thrift stores and flea markets for hidden gems; repurposing existing items, such as framing pressed flowers or creating minimalist geometric patterns with paint, can also yield unique and cost-effective results. Following independent artists and designers on social media can provide early access to new releases and sales.
Furthermore, utilizing online search tools with specific s, such as “minimalist geometric prints” or “affordable Scandinavian wall art,” can refine search results and identify relevant options.
Curated List of Websites and Stores Specializing in Minimalist Home Decor
A curated list of online and offline retailers specializing in minimalist home decor is essential for efficient sourcing. This list is not exhaustive but provides a starting point for exploration. Online resources include: Etsy (for handcrafted items), Society6 (for prints and posters), Minted (for curated art and design), and The Citizenry (for ethically sourced home goods). Offline, consider local art galleries, antique shops, and home decor boutiques.
The availability of specific stores will depend on geographical location.
Minimalist Wall Decor and Interior Design
Minimalist wall decor, characterized by its simplicity and intentional lack of clutter, profoundly impacts the overall atmosphere of a room. The reduction of visual stimuli creates a sense of calm and spaciousness, even in smaller areas. This effect is scientifically linked to reduced cortisol levels, the hormone associated with stress, leading to a more relaxing and peaceful environment.
The strategic placement of a few carefully chosen pieces allows each element to breathe, enhancing their individual impact and the overall aesthetic coherence of the space.The impact of minimalist wall decor extends beyond simply reducing visual noise. It encourages a mindful approach to design, prioritizing quality over quantity. This focus on intentionality translates into a more sophisticated and refined aesthetic, reflecting a conscious design philosophy rather than a haphazard accumulation of objects.
The resulting space feels cleaner, more organized, and ultimately, more inviting.
Minimalist Wall Decor in Diverse Interior Design Styles
Minimalist wall decor’s adaptability allows seamless integration into various interior design styles. In a Scandinavian setting, for instance, a single, large-scale piece of abstract art in muted tones complements the inherent simplicity and natural light of the style. Within a modern industrial loft, a metallic geometric wall sculpture introduces a textural contrast against the exposed brick and metal framework, enhancing the space’s raw elegance.
A minimalist approach, even within a more eclectic style, can serve as a unifying element, providing a visual anchor that prevents the room from feeling overly cluttered or chaotic. For example, a gallery wall featuring three or four small, high-quality black and white photographs could be a stunning minimalist addition to a bohemian-style living room.
Lighting to Enhance Minimalist Wall Decor
Lighting plays a crucial role in showcasing minimalist wall decor. Direct, focused lighting, such as spotlights or track lighting, can highlight specific artwork or sculptural pieces, emphasizing their textures and details. Indirect lighting, through recessed fixtures or floor lamps, creates a softer, more ambient atmosphere, enhancing the overall sense of calm. The interplay of light and shadow can dramatically alter the perception of space and the impact of the wall decor.
For instance, a strategically placed lamp illuminating a minimalist wooden shelf with a single ceramic vase can create a warm and inviting focal point, while a carefully placed spotlight on a monochrome print can transform it into a striking feature. The principle is to use light to sculpt the space and draw attention to the carefully selected elements.
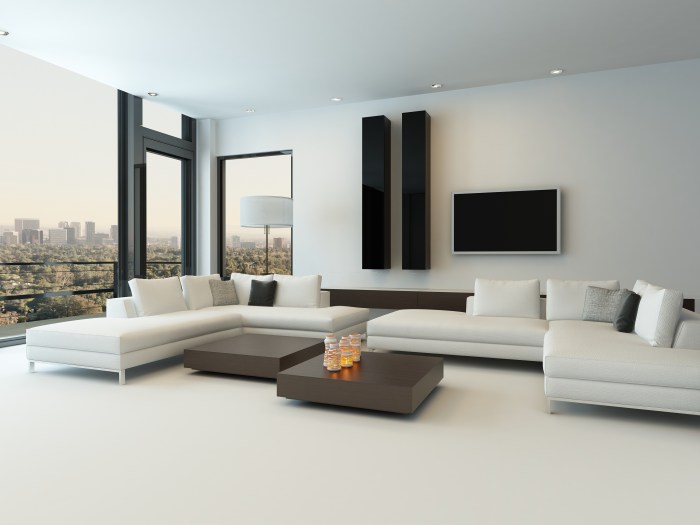
Minimalist Living Room Design
This design features a spacious living room with a neutral color palette—soft greys and whites—to maximize the sense of openness. A single, large-scale abstract painting in muted blues and greys hangs above a low-profile, modular sofa. The painting, approximately 5 feet by 3 feet, is the primary focal point, its soft texture and subtle color variations adding visual interest without overwhelming the space.
To the left, a slender, freestanding bookshelf displays a curated collection of a few high-quality books and a single, sculptural object—a smooth, grey stone. This deliberate sparsity allows each object to stand out and contribute to the overall aesthetic. Recessed lighting provides even illumination, while a floor lamp near the sofa offers a warmer, more intimate light source for reading.
The floor is covered in a light-grey rug, defining the seating area without adding visual clutter. The overall effect is a serene and stylish space that feels both spacious and inviting, showcasing the power of minimalism to create a sophisticated and calming atmosphere.
Illustrative Examples of Minimalist Wall Decor
Minimalist wall decor, characterized by its simplicity and intentional use of space, offers a powerful way to enhance a room’s aesthetic appeal. The following examples demonstrate how diverse forms and materials can contribute to a cohesive minimalist design, relying on the principles of reduction and careful selection. Each piece, while distinct, embodies the core tenets of minimalism: functionality, clean lines, and a focus on quality over quantity.
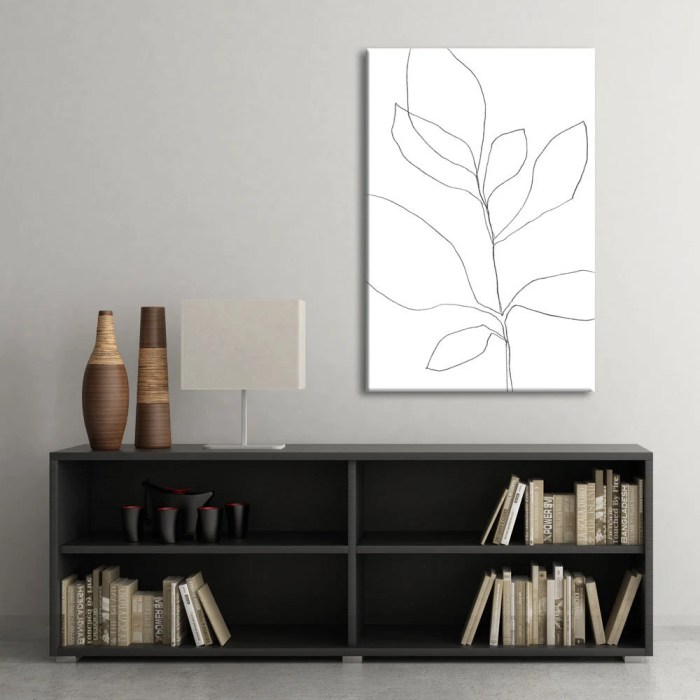
Single-Line Drawing Wall Art
A striking example of minimalist wall art is a piece featuring a single, bold line drawing. Imagine a large-scale artwork depicting a stylized bird in flight, executed in a deep charcoal grey. The line itself is the primary element, its weight – approximately 1/4 inch thick – commanding attention without overwhelming the space. The composition is carefully balanced, with the bird’s trajectory subtly angled across the canvas, creating a sense of dynamic energy within the piece’s inherent simplicity.
The lack of color or detail allows the viewer’s eye to focus on the elegance of the single line and the implied movement of the bird. The contrast between the heavy line and the blank canvas creates a powerful visual impact, demonstrating the potency of minimalism in conveying complex ideas through the most basic elements.
Natural Material Wall Sculpture
A minimalist wall sculpture crafted from natural materials can introduce organic texture and form into a space. Consider a piece composed of three smooth, grey river stones, each varying slightly in size and shape, arranged in a near-perfect equilateral triangle. These stones, meticulously selected for their uniform color and lack of distracting markings, are mounted on a thin, almost invisible, black metal frame.
The subtle variations in the stones’ texture – the smooth, cool surfaces and the slight imperfections inherent in natural formations – create a visual interest that contrasts with the stark geometry of the arrangement. The overall effect is one of understated elegance, a quiet celebration of natural beauty within a minimalist context. The piece’s muted tones and organic forms make it a versatile addition to a variety of interior styles.
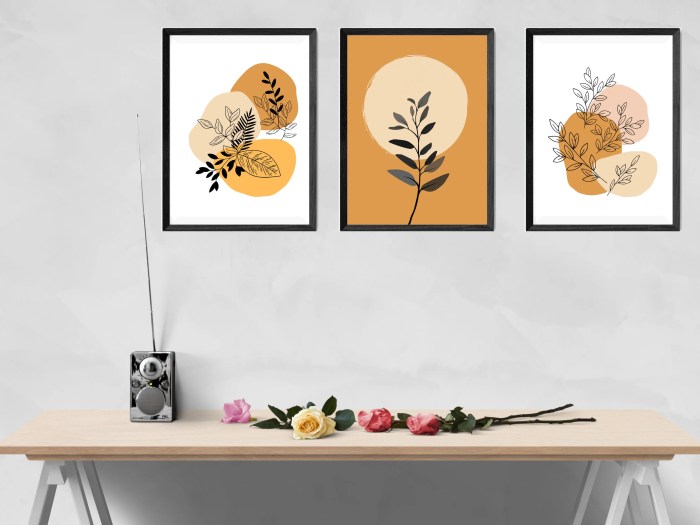
Minimalist Gallery Wall
A minimalist gallery wall successfully demonstrates the power of curated selection and precise arrangement. This example features nine small, square, black-framed prints, each showcasing a single, high-contrast photograph of a natural landscape – a stark desert vista, a close-up of a single flower, a sweeping view of a coastline. The prints are uniformly sized and spaced, with a consistent 1-inch gap between each frame.
This precise arrangement creates a sense of order and visual harmony. The black frames unify the collection, allowing the individual photographs to stand out as distinct yet interconnected elements. The monochromatic color palette of the frames and the mostly monochrome landscape photos reinforces the minimalist aesthetic, maintaining visual tranquility. The overall effect is one of sophisticated simplicity, demonstrating how careful curation can elevate a collection of modest pieces.
Mirror and Geometric Shape Wall Installation
A minimalist wall installation combining mirrors and geometric shapes offers a dynamic interplay of reflection and form. This example features three large, square mirrors arranged in a staggered pattern, with each mirror bordered by a thin, brushed-brass frame. Between the mirrors, three smaller geometric shapes – two equilateral triangles and a square – are mounted. These shapes are constructed from a dark, matte-finished wood, providing a stark contrast to the reflective surfaces of the mirrors.
The arrangement creates an interesting interplay of light and shadow, as the mirrors reflect the surrounding environment and the geometric shapes cast subtle shadows. The clean lines and precise geometry, coupled with the reflective properties of the mirrors, enhance the sense of space and depth within the room. The contrast between the cool reflective surfaces and the warm, matte wood creates visual interest without sacrificing the minimalist aesthetic.
Final Wrap-Up
Ultimately, minimalist wall decor is more than just a trend; it’s a design philosophy that prioritizes intentionality, balance, and the power of negative space. By understanding the core principles and exploring various styles, you can curate a space that reflects your personal aesthetic while fostering a sense of calm and well-being. Whether you choose a single, impactful piece or a carefully curated gallery wall, the journey of creating minimalist wall decor is a process of thoughtful selection and mindful arrangement, resulting in a space that is both visually stunning and deeply personal.
The key lies in embracing simplicity, celebrating negative space, and focusing on quality over quantity. The result? A space that resonates with tranquility and sophistication.
Essential FAQs
What are the best lighting choices for minimalist wall decor?
Soft, diffused lighting enhances minimalist decor. Recessed lighting or strategically placed floor lamps avoid harsh shadows and highlight textures. Avoid overly bright or direct lighting.
How do I incorporate minimalist wall decor into a maximalist room?
Introduce minimalist elements as a counterpoint, perhaps a single large piece of minimalist art on a maximalist wall to create visual balance. Consider a minimalist gallery wall with carefully curated pieces in a section of the room.
Are there any downsides to minimalist wall decor?
Some might find minimalist decor too stark or impersonal. It requires careful planning and selection to avoid a cold or empty feeling. The success depends on choosing pieces that resonate with the individual.
Can I create minimalist wall decor on a budget?
Absolutely! Use DIY methods like creating geometric wall hangings from inexpensive materials, or framing your own photography. Explore thrift stores and online marketplaces for affordable prints and frames.